Instructions for setting NTFS permissions |
Instructions for setting NTFS permissions |
| SLAC |
|
FAQ |
Administrative accounts, such as 'System' and 'Administrators', must be included in the permissions of directories and files on the network drive in order for administrative tasks to be performed (e.g., migration of data to larger volumes, anti-virus, etc.).
The recommended way to share files is by using the Groups Directory (V: drive). We realize that a subset of users share files from each other's home directories. These users need to explicitly set permissions to allow for this wider access. To do so, you can use this script. Unless you are familiar with NTFS permissions, please be cautious when resetting your permissions. If you need help, please contact desktop-admin@slac.stanford.edu or your local administrator.
1)From
the Start button, select Programs -> Windows NT Explorer
2)Scroll
down and right-click on the directory, folder or file that you want to
set permissions on your home directory in this case.
3)Select
Properties from the context menu.
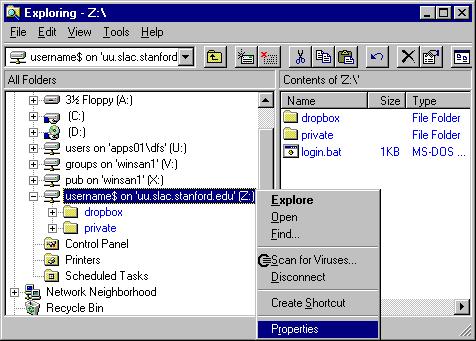
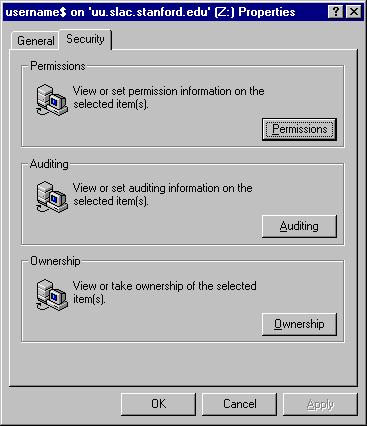
4)From
the Properties screen, select the Security tab.
5)Click
on the Permissions button.
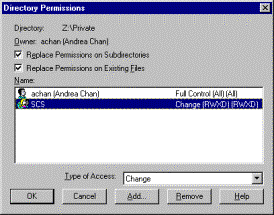
6)In
the resulting Directory Permissions screen, you see the Access
Control List (ACL) which is a list of users and groups, and their respective
access privileges.
There
will be two sets of parentheses. The first set indicates the type
of access to the directory. The second set indicates the type of
access to the file.
(You will see a similar File Permissions screen for files.)
·If
you wish to allow access only to yourself, set the ACL to allow yourself
Full Control (substituting user achan with your own NT
user account name).
·Remove
all other account names from this ACL.
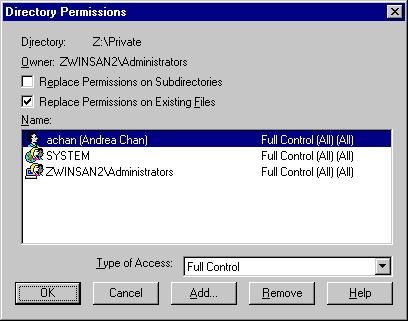
For
changing permissions on existing sub-directories and files:
·Enable
Replace Permissions on Subdirectories -- sets all subdirectories
and files within them to the same permissions.
·Enable
Replace Permissions on Existing Files -- to set all files in the
selected folder to the same permissions.
To
grant access to additional users or groups, click on Add
and follow Step 7 below for details on Add Users and Groups to
the ACL.
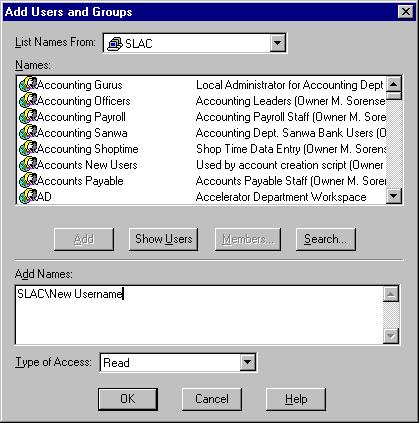
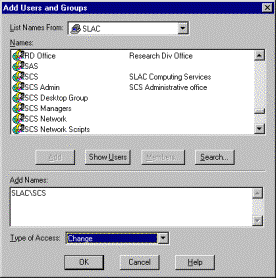
7)
If you would like to grant access to your files to other users or groups, in
the Add Users and Groups screen,
·Ensure
that the List Names from: field indicates SLAC
The
available Group accounts will display.
To
see the available User accounts,
·Click
on Show Users, ·Scroll
down to select the user or group you want to include, ·Click
on Add. If
you wish to distinguish between the types of access granted to different
users and groups, you need to do so in the Directory Permissions
window (Step 6). The Type of Access specified in this Add Users
and Groups window applies to all accounts entered in the Add Names
field. ·Click
OK to accept the changes. ·Review
your changes on the Directory Permissions screen, click OK
again to accept the changes.
Owner: Desktop-Admin